22 Jan 2020 Ruckus Data Plane Making Remote Working Easy


Ruckus Data Plane Making Remote Working Easy
A common deployment question we often get asked is: “I have a remote office; how can I tunnel all traffic back without the need for an expensive leased line or buying a dedicated firewall to create a site-to-site VPN”.
Ruckus has a simple, yet powerful solution known as the Ruckus Data Plane which has been around for some time, but not everyone is aware of how simple and effective it is.
Getting the boring bits out the way first; like all Ruckus Products, it is available in either a Virtual appliance or a Physical Appliance, if you have an SZ100 or SZ300 the Data Plane is built-in at no extra cost, hurrah!
So how does it work?
All Ruckus access points communicate with a Ruckus SmartZone Controller, whether local to the controller or located at a remote site. Using the Ruckus Data Plane this takes the solution one step further by creating a secure tunnel to the Data Plane tunnelling all user data back to a central location
So, like me you are most likely thinking well isn’t this just a VPN…. well yes to a point; however what the Data Plane allows you to do is tunnel all the traffic back to your datacentre with VLAN tags – meaning all DNS/DHCP traffic for client data is tunnelled without the need for any switch configuration at the remote site, meaning all you need is simply just an internet connection.
Better yet, this means that your remote workers can access all resources as if they were physically in the office. Their device traffic will be tunnelled to the same subnet in the office, using the same DNS/DHCP server, whilst still complying with any firewall security policies that you have set on your corporate network.
Topology
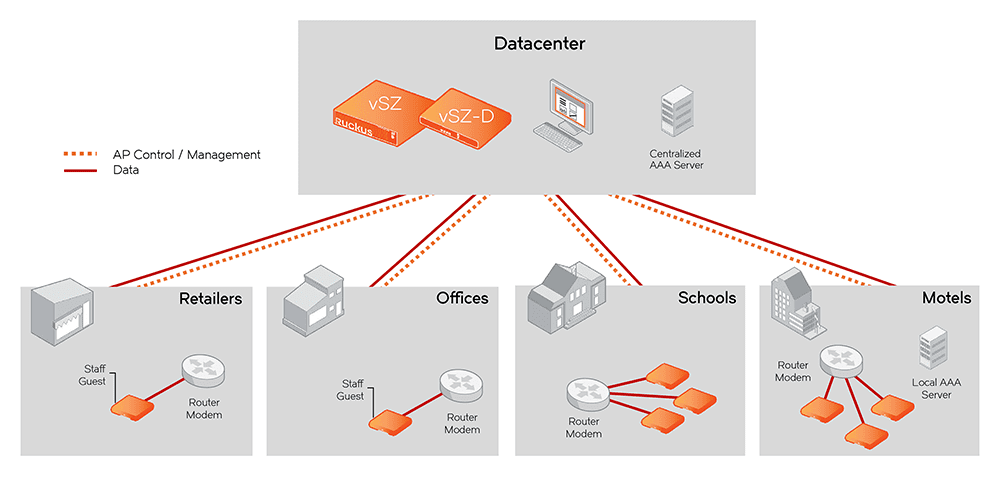
Below is a simple topology of how the solution could be used across all verticals:

Data Plane Configuration
The next section assumes you have a Ruckus SmartZone Controller deployed already. In my example I am using the Virtual Data Plane (vSZ-D) and my Access Point will form a tunnel to 37.130.253.9 which is then forwarded to the internal IP Address of 10.24.0.4 on ports TCP/UDP 23233


SmartZone Configuration
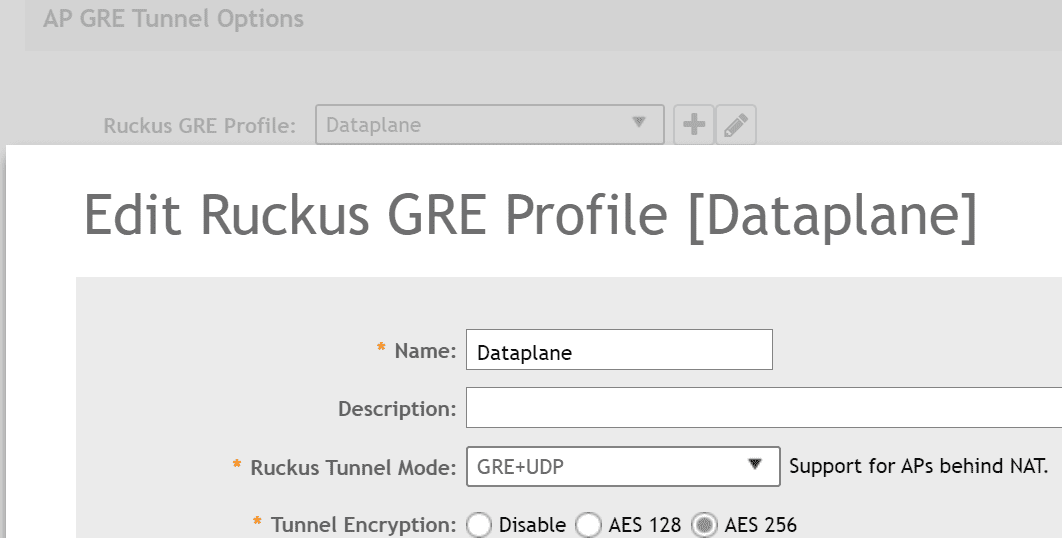
Within your Zone configuration you need to create a “Ruckus GRE Profile”, whilst this sounds hard its nothing more than a Tick Box, in my example, I have chosen to encrypt the Tunnel Data to provide security as the traffic traverses the internet.

SSID Configuration
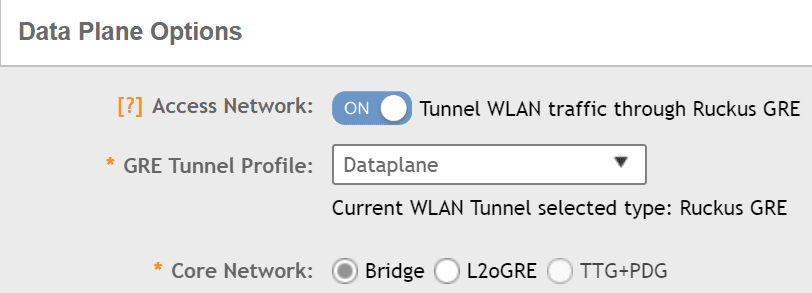
Within your SSID you create it in the exact same way you have always done however under the “Data Plane Options” enable the “Access Network” option and this will tell the Access Point to tunnel all traffic back via the Ruckus Data Plane.
In this example, the SSID will place me into VLAN 110 which is the Technical Subnet.

Is it really that easy to setup?
Let’s prove the point – the next few screenshots will show my Access Point IP address, my private and public IP address of when I am connected to my home network and when I am connected to the Data Plane with the traffic breaking out of Purdicom.
Connected to SSID “Bear-Network”
My Home H510 Access Point IP Address

My laptop connected to my home SSID and the IP Address received is 192.168.1.9. I run a flat network at home and as you can see my laptop is in the same subnet as my access point.

Connected to SSID “Purdicom-Test”
As you can see my device is still connecting via “Office AP” however my private IP address is now 192.168.110.12 and my VLAN ID is 110 in a completely different subnet.
My Public IP Address is now 82.163.188.172

Now my device is within the Purdicom network and it is fully protected by our WatchGuard firewall and I am restricted by its policies but I can also access all resources from my house much like a VPN but without needing any end device application or configuration.
As you can see when I try to access a Proxy Avoidance website I am instantly blocked.

The elegance of this solution is that the edge switches at remote locations do not require any VLAN configuration, the secondary ethernet ports on the Access Points can also tunnel data back so in effect the entire remote site could be part of your HQ office without needing expensive firewalls or switching.
Better yet remote users working from home could access company resources simply by connecting to the same SSID that you broadcast in the office at their home with ease and no fuss and no support calls.
Written & Published by Alex Claro – Solutions Architect Team Lead at Purdicom (CCNP, CWNA)